Friday, March 29, 2013

Stepping Outside...
...Looking Inside

It was an absolutely gorgeous day here in Chicago. After a stretch of cold, damp, gray weather, sunshine and temps in the low 50s were a welcome change. Though there is plenty that needs to be done here at my apartment, days like today are gift to be savored. One nice thing about living in a city - you can get away from it all without going too far.

I had a nice lunch at a Thai restaurant in the Buena Park neighborhood, hopped the L to the Wicker Park/Bucktown area, and grabbed a latte in the Loop before hopping the L back Rogers Park. Chicago is definitely a city of neighborhoods, each with its own flavor and claim to fame. I have to confess, despite the fact I have lived in Chicago for nearly 5 years, I still am unclear as to the boundaries and locations of several neighborhoods. Sometimes you can find a banner, flag, or sidewalk marker to let you know where you are, but in the case of Bucktown and Wicker Park, they have the same sidewalk markers, so unless a place advertises that it's in one neighborhood or the other, I am never quite sure which neighborhood I am in.

Over the years, people have tried to explain the boundaries to me. I smile and nod and say "Ohhh, okay," but most of the time the information is meaningless to me. Part of it is a product of being born and raised in the Northeast. Roads out East ramble along around mountains and over rivers. Out East, directions are usually given by landmark, not by compass point. This system makes more sense to me, but it is not without its disadvantages. For one thing, a house is almost always referred to by it's PREVIOUS occupants, unless of course those occupants weren't "from around here." The house across the street from my folks was known as 'The Paul House' from the time they sold it in 1970 until it was demolished nearly 40 years later.

That sort of sense of tradition is not unknown here in Chicago. Bucktown got its moniker from the herds of goats kept there in the 19th century. Wicker Park is named for Charles and Joel Wicker, the brothers who laid out one of the original subdivisions in the neighborhood. Though the area has a decidedly urban feel, I felt connected to my East coast roots today. Milwaukee Avenue runs at an angle to to the rest of Chicago's grid system, so there are streets that meander and aren't parallel or perpendicular to each other. Just as I would out East, I spent some time today exploring some of the little side streets.

The area is a mix of 19th century and contemporary architecture and I spent quite a bit of time photographing a beautiful, gable front, brick building with wonderfully weathered Italianate details and a cast iron fence that had seen better days. Many of the commercial buildings have cast iron facades, not unlike the commercial buildings in Upstate NY, where I lived for about a dozen years. The neighborhood is also home to Santullo's, one of the few places I've found in Chicago where I can get real, New York-Style pizza. I even happened upon a connection to Cherry Valley, the little town of 1,200 people were I lived in NY. I was exploring a book store when a 'Just Arrived' sign caught my eye. The book, East Hill Farm, by Gordon Ball, is about a farm in Cherry Valley that Allen Ginsberg purchased and used as a writers' retreat back in the late 1960s.


Thumbing through the book brought back pleasant memories. Though I didn't live in Cherry Valley in the 1960s, I did help with a beat poetry reunion and festival hosted there some 30 years later. I had seen most of the photographs in the book and part of the poetry weekend included tours of what remained of the East Hill Farm. I had ventured out today because my head has been swimming with all sorts of thoughts about this blog, my artwork, and what I want from life. I had been in this very bookstore not 24 hours earlier, listening to presentations by two very different artists, yet each gave me perspective on my own creative journey. As I put the book back, content, but not the least bit homesick, I realized that I am where I need to be.

It was nice to get outside without the weight of a heavy, winter coat, and it was nice to look inside and see the past without the weight of second guessing.


Wednesday, March 27, 2013

Toying Around In The Studio...
...3-D Assemblages

As you may have guessed from my posts, I love thrift stores, and I hate to throw things away. If you visit my art website: EricEPaige.com, you will notice I like to work in a variety of styles and media. Last Spring I started playing around with making pieces from found objects and dollar store and thrift store finds. It has been a nice break from my regular painting and photography, and it has allowed me to make some fun, lower-priced items to sell at fairs and to donate to fundraisers. I used to own a store, and learned the importance of 'smalls' (inexpensive, easy to carry items). Better to have a customer spend a few dollars than no dollars, or, as an antiques dealer friend used to say, "I'll take fast nickels over slow dimes anyday!"

I get a lot of my creative kicks from figuring how to use things in unusual ways and pushing the limits of what a product is designed to do and these projects have been a great way to stretch my creative muscles. I am sharing a work in progress tonight (but there are finished pieces on my website).

Every now and then a bottle or jar of an unusual art supply shows up at a thrift store at a really reasonable price. A few months back I found a bottle of a special primer for styrofoam. Intrigued, I bought it. Somewhere along the way, I bought something (not sure what) that was cushioned by a square piece of styrofoam with a shallow, bowl-like indentation. I decided this would be a perfect piece for test driving the primer, and to give a real test, I decided not only to paint it, but paint it with styrofoam's arch-enemy, spray paint (the solvents in the paint dissolve the styrofoam). My one complaint about the primer is that it is virtually the same color as styrofoam, so I wasn't quite sure I had gotten full coverage. Indeed, if you look closely, there are areas with recesses where the paint made it through an un-primed spot (they got re-primed and re-painted). The inner part of the bowl is a hammered copper finish and the exterior a textured metallic black metal finish.

(c) 2012 Eric E. Paige, All Rights Reserved

I suppose empty it has a beautiful simplicity, but my natural instinct is, "Oh, an empty bowl; what can I put in it?". Somewhere in my travels, I found three of these oak leaves (oddly enough, on two separate visits). I am not sure what they are, curtain tiebacks or napkin rings maybe? Whatever the reason for the loop on the back, the design was perfect for giving the illusion that the leaf was floating in the bowl.

(c) 2012 Eric E. Paige, All Rights Reserved

I also changed the finish on the leaf to better match the rest of the piece. The final element is a plastic salamander that I gave a metallic finish. Oak leaves symbolize immortality and salamanders are a symbol of the creative process. Seems appropriate for an art piece made from a piece of plastic that would last forever (or practically forever) had it been put in the landfill. I am still playing with the finishes and haven't settled on the framing yet, so stay tuned!

(c) 2012 Eric E. Paige, All Rights Reserved

Tuesday, March 26, 2013

We've Had The Bitter...
...Now For The Sweet!!!

I recently posted how to make homemade horseradish and its symbolism in the Judeo-Christian tradition. I think it's time for something sweet. I was going through my pantry recently and discovered that some ground almonds were rapidly approaching their expiration date, so today I made Cherry-Chocolate-Almond Scones. I am not sure I would go so far as to say these are 'healthy' scones, but they certainly are 'healthier' than the traditional recipe.

It's the ground almonds that help make the scones healthier. By substituting almond meal for half the flour, I reduced the carbs and raised the fiber content. I also added dried cherries for more flavor and fiber. Almonds are high in fat, but it is the better for you fat, and because of the fat content of the almonds, I was able to cut back on the butter and use milk instead of cream or half and half.

A lot of my cooking is done on the fly and by eye, but since I wanted to share the recipe, I decided to measure as I went along. I made the dough in my food processor, but you could mix it by hand as well. I bought my ground raw almonds from Trader Joe's. You could grind your own in a food processor, but it can be tricky - a few pulses is all that separates ground almonds from almond butter! You could also try almond flour, but I believe all of the skin has been removed, so you lose some of the fiber and nutrients.

Cherry-Chocolate-Almond Scones

1 1/2 cups of ground raw almonds
1 1/2 cups all purpose flour (King Arthur Unbleached is my personal favorite)
1 tsp salt
3 tsp baking powder (my favorite is Rumford low sodium. Not only is it lower in sodium, it is aluminum free and comes in a small container, so chances are you will use it up before it loses its 'umph'
1 Tbs packed brown sugar (brown sugar has molasses, which helps food keep longer and has some trace nutrients)
1/4 cup (half of a stick) unsalted butter (if you are vegan, you could use a vegan butter substitute or palm shortening)
1/4 cup dried cherries (I get mine at Aldi or Trader Joe's. They have the following ingredients: Cherries, Sugar.)
3/4 cup milk
1/3 cup semi-sweet chocolate chips (Regular or dairy free, your call but get chips made with real vanilla, they taste so much better! Trader Joe's has them and they are usually cheaper than the national brands).

Preheat oven to 425 F for a glass baking dish, 450 F for metal.

To make in a food processor:

Put the almonds, flour, salt, baking powder, sugar, butter, and cherries in the food processor and pulse until the butter is cut-in (if you want the cherry chunks to be bigger, add them AFTER you cut in the butter). Add the milk and process for a few seconds to form a dough. Turn the dough out on a floured board and knead 3 or 4 times and pat out about 3/4 inch thick. Sprinkle about 1/2 the chips evenly over the dough and fold in half. Flatten again and sprinkle on the rest of the chips. Fold in half and knead 2 or 3 more times (don't over work the dough. I baked the dough as one whole round in a pie dish, but you could also cut into individual wedges and bake them on a sheet or cast iron skillet. If you bake them as a whole round, score the top of the dough into eighths (see photo)

(c) 2013 Eric E. Paige, All Rights Reserved

Bake for 15 - 20 minutes (toothpick inserted near center will come out clean).
Then the hardest part: cool for 15 - 20 minutes.

(c) 2013 Eric E. Paige, All Rights Reserved

To make by hand:

Dust the cherries with flour and chop to the desired consistency. Combine the almonds, flour, salt, sugar, and baking powder and cut in the butter using a pastry blender. Stir in the milk until just combined (don't over beat). Turn out and roll in the chips and bake as described above.

ENJOY!

P.S., you don't have to tell people these are healthier, but you DO have to tell people they have almonds in them - nut allergies are a serious thing!

Monday, March 25, 2013

Re-Purposing A Table...
...Right-Sizing A Room

Lately I have been hearing a term on home improvement shows: 'right-sizing". The concept is simple, you use the space you have to its fullest potential for YOUR lifestyle. If space is at a premium, you need to think beyond the architect's designation for the room. My current place is a two bedroom apartment. It is a classic Chicago, brick 2-Flat, with a bay window front. The living room and dining room are basically open to each other with a large, framed opening delineating the two rooms. The living room is actually the smaller of the two spaces. When I first moved in, I used each room as a living room. I have always thought dining rooms were a waste of space. I prefer to eat in the living room in a comfortable chair or on the couch. Having just moved out of a studio apartment, I liked the idea of having two living rooms!

Then Thanksgiving came. Thanksgiving is one of my favorite holidays, and I wanted to host a Thanksgiving dinner. My landlord's unit has the same floorplan, and he had the front room (meant to be a living room) as a dining room and the dining room was the living room. This made perfect sense for the way we live today. When the building was built, 'parlor suites' were smallish pieces of furniture, a chair or two and a loveseat or divan, whereas a dining room from that period might have a table and chairs, a buffet, and a china cabinet. The modern living room generally has much larger furniture, plus a coffee table and a TV. I decided for the holiday, I would turn the front living room into a dining room. I ended up borrowing the landlord's table (thankfully it was from Ikea and very easy to take apart and carry upstairs). To my surprise, I liked having just one living room (much cozier), and really liked the look of a dining room. After returning the dining table to its rightful owner, I decided it might be time to look for one of my own.

I was fortunate to find the smaller version of my landlord's table at a Goodwill for only $10. At that price I figured it would work for now, and perhaps someday I would salvage the legs and put on a larger table top.

Fortune smiled upon me a few weeks later and I found an oak coffee table that was a little worse for wear, but the wood was absolutely beautiful, and it was only $6.99! As you can see, it had some water rings, scratches, and a honey oak finish that didn't quite go with my decor.

Detail of a black water ring
(c) 2012 Eric E. Paige, All Rights Reserved
Detail of scratches and stains
(c) 2012 Eric E. Paige, All Rights Reserved
The table taken apart
(c) 2012 Eric E. Paige, All Rights Reserved

I disassembled the table, figuring I would refinish the apron and top, and use the legs from my other table. I didn't want to use a chemical stripper, so since I was dealing with flat surfaces, I decided to sand off the old finish with my random orbit sander. I started with an 80 grit and finished up with 120. Rather than buy wood bleach, I used Barkeeper's Friend scouring powder to remove the black water ring and a few other dark spots. Wood bleach is oxalic acid, and oxalic acid also happens to be the active ingredient in Barkeeper's friend. (Oxalic acid is toxic, so if you try this trick or use wood bleach, be sure to use caution and read and follow label precautions).

The old finish has been sanded off
(c) 2012 Eric E. Paige, All Rights Reserved

I decided to us a polyureathane/stain combo in satin finish. I found a color that would coordinate with some other furniture I had in the room. It is important to follow the instructions on the poly/stain, letting it dry thoroughly between coats. It is also important to sand between coats. I used 220 grit sanding sponges. They are reusable and much less hassle than sandpaper. As you can see, there is some beautiful grain patterns and tigering in the wood.

(c) 2012 Eric E. Paige, All Rights Reserved

Removing the legs from the other table was going to be a little more difficult than I thought, and so I decided to just set the 'new' top on the old table, and look for other options. I also decided, that while it was nice to have a dining room, I still only had dinner guests a few times a year, so I set up the table and the rest of the furniture so I could use the room as an office, but quickly put everything away if I was having a dinner party. At the time I had a small netbook which I connected to a flat screen monitor I bought at Goodwill for $15.00. I can tuck the monitor behind a console table and store the printer on the bottom shelf of a side table when not in use.

Dressed for Dinner
(c) 2012 Eric E. Paige, All Rights Reserved
The Refinished Top
(c) 2012 Eric E. Paige, All Rights Reserved
Dressed for Success
(c) 2012 Eric E. Paige, All Rights Reserved

As turned out, fortune smiled upon me again! While poking around a local used furniture and salvage store, I found a set of four table legs. I asked the owner how much they were. At first he was a bit reluctant, as he was going to use them for a similar project, but he finally decided I could have them for $20, along with the apron (which I hadn't noticed before--bonus!). I walked my new purchase home (which was about a mile); I had the legs tucked under one arm and the apron slung over one shoulder. It was Good Friday, so I felt extra conspicuous walking down the street with a large wooden object on my shoulder! The legs and apron were in good shape, so no refinishing was required. I just screwed the top to the base (there were pre-drilled holes on the base).

Apron and legs from a local thrift store
(c) 2012 Eric E. Paige, All Rights Reserved
Base and Top Assembled
(c) 2012 Eric E. Paige, All Rights Reserved

Now I have a room that is right-sized to serve double duty and a beautiful table for a little over $30 in thrift store finds and finishing supplies. So take a look around your home. Are you using each room to its fullest, best potential? While your out and about be sure to check out those thrift stores, yard sales, and clearance deals. With a little effort, you can breathe new life into an item and have a unique piece for your home (and yes, those are different chairs in the second set of photos, but that's for another post....)

Sunday, March 24, 2013

Busy Saturday...
...Lazy Sunday

A Busy Saturday

We all say it, and it's true: the weekends are far to short! Yesterday was a busy day. I belong to a cycling club, and though it is still quite chilly here in Chicago, we had our Kickoff Party last night. As the coordinator of the event, I had some last minute things to do to get ready for the guests, but I did manage to get some personal stuff done as well. Among other things, I made a batch of horseradish. As I posted earlier, it is a relatively simple thing to do, and well worth the effort.

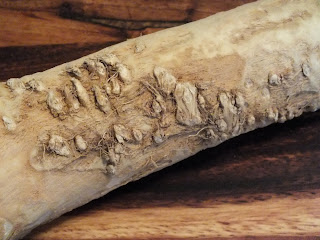
Assuming you don't grow your own horseradish, your best bet for buying a good quality root is to go to an ethnic market or natural foods store. I got mine at a Polish market, but I suspect you could also get great roots at a Jewish market.

Horseradish Root
(c) 2013 Eric E. Paige, All Rights Reserved

Horseradish is an integral part of Polish Easter celebrations as well as the Jewish Seder. In the Seder, horseradish is the most common choice for the 'Maror' or bitter herb, a reminder of the bitterness of slavery. In the Polish tradition, the horseradish symbolizes the bitterness of Christ's sacrifice, and sometimes the horseradish is colored with beet juice to represent the blood of Christ. Like the Seder, the Polish Easter celebration is filled with symbolic foods and some sources suggest this is a Christianization of the Seder, recognizing that the 'Last Supper' (Good Friday) was indeed as Seder meal.

But I digress...

The first step, peel the root. Horseradish is dense and has a thick peel, a sharp potato peel or paring knife is in order. I recommend buying the root on the day you plan to make the horseradish. I had this root stored in a cool room, but it still dried out a little, which makes it a bit tough. In fact, I probably will get a fresh root this week and make another batch for the family dinner.

Peeled Horseradish
(c) 2013 Eric E. Paige, All Rights Reserved


The next step is to cut the root into chunks (You don't want to burn out the motor on your blender!)

(c) 2013 Eric E. Paige, All Rights Reserved

These two inch chunks proved to be a bit of struggle for my blender, so I cut it into finer pieces, less than inch.

(c) 2013 Eric E. Paige, All Rights Reserved

The other ingredient is vinegar. I have a one-gallon plastic jug of vinegar in the kitchen, but that's the vinegar I use for cleaning. A good quality, white vinegar, in a GLASS bottle, is what you want for this project. Pour a cup or so of the vinegar in the blender with a third of the horseradish and blend on a high setting (my blender is a vintage 8 speed, so I used the highest setting). As the horseradish gets processed, stop the blender and add more horseradish and vinegar. You may have to stop the blender periodically to pop air bubbles (be careful, you DON'T want this splashing in your eyes!). If your blender has a 'pulse' option, you may want to try that. The goal is to puree the vinegar and horseradish together into a sort of 'horseradish smoothie'. I bought fairly sizable root and used about a pint of vinegar and ended up with a blender full of horseradish.

The Final Product
(c) 2013 Eric E. Paige, All Rights Reserved

I store it in sterilized mason jars. This year, I may try to store some of the extra in the freezer (though not in glass!). It is best made a week or less before the big day, especially if you want it to be a nice, bright white. Food safety is important, you don't want be sick, or make your guests sick. For recommendations/techniques on sterilizing the jars and guidelines on how long it will keep, check out the canning section of the USDA Website

A Lazy Sunday

After a busy Saturday, it was nice to have mellow sort of day. Sunday's are often a busy day for me. I normally like to spend the day cooking multiple dishes so I don't have to cook as much during the week, or, weather permitting, heading out with my camera and exploring the city. Today, not so much. I think it's good for our bodies and our souls to get some rest and unwind. When we are kids, we fight naps with every fiber of our being, but as an adult, I have developed a fondness for them, and I indulged in a rather lengthy one today. Relaxed and refreshed, I edited a few photos, and wrote this post, and I think that's plenty for today!


Friday, March 22, 2013

The Yoga Geese Are Gone ...
...And Other Signs of Spring.

People here in Chicago have been a bit thermometer obsessed lately. The calendar says it's Spring, but the thermometer makes one wonder. The unseasonably cold temperatures have been even more discouraging as we remember the spate of 80 degree days we had last Spring. However, despite the fact that I am still wearing my heavy, winter coat, there are signs that Spring is here.

A few weeks ago I happened upon a small group of geese, which I nicknamed the 'Yoga Geese' because one of them was standing on one leg, reminding me of the 'Tree Pose' in yoga. I have to say, I was impressed with the goose's ability to maintain the pose, especially in the midst of falling snow!

Tree Pose
(c) 2012 Eric E. Paige, All Rights Reserved

The following week it looked like the other geese had gotten into the act, doing variations of 'Cobra', 'Downward Dog', and poses that I couldn't even identify, let alone attempt.

Cobra
(c) 2013 Eric E. Paige, All Rights Reserved
Yoga Goose
(c) 2013 Eric E. Paige, All Rights Reserved
Downward Dog
(c) 2013 Eric E. Paige, All Rights Reserved

Last week, I couldn't wait to see what poses my avian friends would be practicing, but they were no longer on the ground. They were flying high over head as part of a much larger flock. The Spring Migration had begun, and this week there was not a goose to be seen on the ground or in the sky.

There are other signs of Spring as well. If you look around, the buds are swelling on some of the trees and the other day I saw a squirrel digging up part of it's winter stash (and boy did I get glared at -- don't worry Mr. Squirrel, despite my love for unusual foods, acorns are not on my list!). The sun is rising a little earlier and setting a little later each day. If geese, squirrels, and longer days aren't enough to convince you, here is a picture I took on the first day of Spring. These hardy flowers knew, despite temps below freezing, Spring had arrived, and it was their time to blossom.

Crocuses
(c) 2013 Eric E. Paige, All Rights Reserved

It can be hard to get into the 'Spring of things' with the weather being so cold, but if bird, squirrels, and crocuses can do it, then so can we! If your still having trouble, I have uploaded some of my favorite photos from last year's protracted summer to my photography gallery. Go to www.EricEPaige.com, select 'Works' and then click the link in the Photography Gallery (plenty of summery artwork in the painting galleries, too!)

Thursday, March 21, 2013

One Person's Trash...
...Can Be A Decorating Treasure

I mentioned yesterday that I would be posting re-purposing projects. My sister was one of the first people to suggest I start a blog, and this project is the one that prompted her to make that suggestion. I am definitely not above dumpster diving and when I was walking back from the recycling center I saw this very bright yellow stool in an alleyway (I know it looks white in this picture, but you will see in later shots that it was canary yellow). It was missing its rush seat and a little wobbly, but it definitely had potential.

(c) 2012 Eric E. Paige, All Rights Reserved
I briefly toyed with the idea of re-weaving the seat, but I had just finished working on the sun-porch and wanted a little table to use as a plant stand. I had a small collection of Asian inspired items and the lines of the stool definitely fit in with that theme. I also had a fair amount of scrapwood, mostly ends of boards that I had trimmed for other projects. I used scrap 1" x 3" to make a box that set inside the top of the stool:

(c) 2012 Eric E. Paige, All Rights Reserved

I screwed the box in place from the inside (which also helped make the piece more sturdy). The cross piece (the darker board) not only provided bracing, but also gave me something to attach the table top to. For the top I used a scrap piece of 1" x 12".

(c) 2012 Eric E. Paige, All Rights Reserved

If you're building something from disparate elements, primer is your best friend. Once everything is all one color, you can quickly tell if the piece is going to work. I knew that at least part of the table I wanted to do in a faux finish that simulates old varnish. That particular technique requires a red base coat so I use a red primer. Anyone who has tried to paint a room red knows that it takes numerous coats to get full coverage. This particular primer solves that problem. The good news is, I only paid $2 for the quart of primer, the bad news is I paid that little because the local paint store was no longer carrying the product. I checked the manufacturer's website and fortunately, if any of you are planning on painting something red, the product is still available. I am not sure of the price, but if you've ever had to paint 5 or 6 coats on a wall, a primer that cuts that number down is worth its weight in gold. Here is the link: http://www.muralo.net/products/primers_interior_2279.php

And here is the table all primed:

(c) 2012 Eric E. Paige, All Rights Reserved

I used a fairly thin black paint as a glaze over the red primer, giving the illusion of a wood grain. I used a fairly coarse brush to get some nice grain lines. A disposable 'chip brush' (those inexpensive bristle brushes sold at most hardware stores) works great for this. I used latex paint, so I had to work fairly quickly, but on a small piece like this, it's fairly easy. I knew I wanted to highlight part of the piece with a gold finish, and at first I thought part of it should be green to coordinate with the room where the finished piece would live.

(c) 2012 Eric E. Paige, All Rights Reserved

Though I liked the look, it was still pretty obvious the top was a piece of scrap pine, so I decided to give it some texture and patina by applying a porcelain crackle medium. You'll also noticed I changed the color scheme...

(c) 2012 Eric E. Paige, All Rights Reserved

In the end, I changed the color scheme one more time, deciding that the green just wasn't working. Here are some pictures of the final product:

(c) 2012 Eric E. Paige, All Rights Reserved

So before you discard something, take a good look at it. It may just need a new coat of paint, or perhaps you can make it into something completely new!

There are more re-purposing projects on my blog.  Click here for one of my favorites!

Wednesday, March 20, 2013

SPRING - A Time For New Beginnings, But Don't Forget Your Roots!

Though it's only 24 degrees here in Chicago, today is the first day of Spring -- the perfect time to start something new. Last year I launched a website for my artwork Today I am taking things a step further, by launching this blog (or relaunching it if you a are viewing it on my artwork website). Over the past year I have received a lot of positive feedback on my Facebook posts, particularly my cooking and re-purposing projects, as well as my art and photography. This blog will share my projects along with other helpful information that I come across.

There are many types of artists and artwork -- while some of my work might have a greater meaning, a lot of it is created because I think we should all live in beautiful surroundings. The same goes for my other projects. Having picked a lot of low paying jobs over the years, I have taught myself how to do a lot with a little. You don't need a big budget to make your home beautiful or put a delicious, healthy meal on the table, and this blog will show you how.

So that's the New Beginning, now for the roots -- literally and figuratively. Spring is a time for celebration in most cultures. Having been raised in the Christian tradition, that celebration is Easter. My Mother's family is Polish, and for the Polish, Easter is perhaps the most important holiday of the year, therefore, it also has special foods. My favorite is Easter or świeże kielbasa (świeże means fresh) served with horseradish. My grandmother didn't make fresh horseradish, she bought it in a jar from the local grocery store. I didn't have the real deal until I was living in upstate NY. I learned how to make it from a Slovenian farmer. Every year his son-in-law and his friends would come over to help dig the roots and clean and peel them. Depending on how potent the roots are, this could be an experience that literally brought tears to your eyes. After cleaning and peeling the roots were cut into smaller pieces and processed in a blender to the desired consistency. The end product was not the yellowish gray mush you buy in the store, but a snow white condiment bursting with not just heat, but flavor. It was love at first bite!

My first attempt to make horseradish on my own was less successful. The root I bought was on the weak side and was a little too tough and stringy. I decided that probably a store bought root was just not going to cut it and since I no longer lived in Upstate NY and had no place to grow horseradish that I would have to just enjoy the memory of days gone by. For the past few years I have spent Easter here in Chicago with my brother-in-law's cousins. Also of Polish descent (my brother-in-law's Grandfather had a Polish grocery store in Chicago's Bridgeport neighborhood), they enjoy many of the same Polish foods that I had growing up. Last year, while poking around one the Polish markets, I saw horseradish root and decided to give it one more try (worst case scenario, it would suck and I would bring something else to the dinner). The roots looked much fresher than the one I had bought at a grocery chain years ago and when I picked one up, there was actually a faint smell of horseradish. It turned out quite well and got rave reviews on Easter Sunday, so I am making it again this year. I picked up a root today (pictured here) and will post pictures of the finished product.

Horseradish Root
(c) 2013 Eric E. Paige, All Rights Reserved

We are a nation of immigrants and while it is important to move forward, it is also important to remember where we came from. In a culture that values homogeneity as much as ours, traditions can fade quickly. All four of my Mother's grandparents were from Poland, her parents could speak Polish, my Mom can understand most of a conversation in Polish but cannot speak it fluently, and my sister and I only know a few words and phrase. Food is a great way to honor our heritage - a direct sensory connection to the past. I hope, whatever your heritage, you take the time this Spring to enjoy the foods and traditions of your ancestors.