I read an article on the Irish Potato Famine today. Using DNA samples from dried leaves stored in botanical collections (leaves that were more than 160 years old!), the scientists were able to sequence the genome of the offending pathogen and determine not only was it not the strain believed to be the culprit but that it also no longer exists.
As amazing as this is to a science geek like me, what caught my eye was the reason why the blight decimated the Irish potato crop and why the pathogen no longer exists. Virtually all of the potatoes planted in Ireland were a variety known as 'Irish Lumpers'. This variety was highly susceptible to the blight. According to the article this strain of blight circulated around the world for 50 years after the famine and then disappeared, partly because people stopped planting lumpers and partly because they began to breed disease resistant varieties.
A similar event occurred in this county in 1970 when a corn leaf blight decimated the U.S. commercial corn crop. Once again, a lack of genetic diversity was part of the problem. Fortunately for the home gardener and small farmer there are numerous heirloom varieties of seeds out there.
Anyone who has planted a garden knows that some vegetables do better than others due to a variety of factors, from precipitation to disease. Why not increase your odds of success by planting multiple varieties of your favorite vegetables? As an added bonus you will get a bigger variety of flavors. As an example, there are 100s of types of tomatoes in various sizes, shapes, and colors. Some are grown for eating raw, others for cooking.
Even the apartment dweller who is limited to container gardening or a couple of pots of herbs on the windowsill can experiment. One year I grew three different types of basil, each with unique qualities.
No green thumb? You can still support bio-diversity by shopping for multiple varieties of your favorite fruits and vegetables. Sadly, the breadth of most people's apple experience seems to be the Red Delicious, the Golden Delicious, and the Granny Smith (maybe a McIntosh if you're feeling adventurous). Go a little crazy next time and try something different. Personally, I think Cortlands are the best pie apple on the planet. Why not buy 3 or 4 varieties and do a side by side apple tasting? It's a good lesson for the kids and much better for you than a slice of cake!
Not sure where to start? Organizations like Seed Savers Exchange are good resource. Many living history museums plant heirloom varieties of fruits and vegetables. Some even sell seeds, but at the very least they can point you to various sources. Your local Cooperative Extension Service is also a great resource for finding out what grows well in your area as well as handy 'how-to' information. You can also check out local greenhouses and nurseries.
For those who prefer to buy rather than grow their food, try local farmers' markets, health food stores, and ethnic grocers. The Internet and your local library can also offer a wealth of information for figuring out what to do with those odd looking tomatoes or that apple variety you've never heard of. Not only might you discover some new favorites, but you will be helping to create a healthier ecosystem -- sounds like a win/win to me.

Showing posts with label Food. Show all posts
Showing posts with label Food. Show all posts
Thursday, May 23, 2013

Tuesday, March 26, 2013
We've Had The Bitter...
...Now For The Sweet!!!
I recently posted how to make homemade horseradish and its symbolism in the Judeo-Christian tradition. I think it's time for something sweet. I was going through my pantry recently and discovered that some ground almonds were rapidly approaching their expiration date, so today I made Cherry-Chocolate-Almond Scones. I am not sure I would go so far as to say these are 'healthy' scones, but they certainly are 'healthier' than the traditional recipe.
It's the ground almonds that help make the scones healthier. By substituting almond meal for half the flour, I reduced the carbs and raised the fiber content. I also added dried cherries for more flavor and fiber. Almonds are high in fat, but it is the better for you fat, and because of the fat content of the almonds, I was able to cut back on the butter and use milk instead of cream or half and half.
A lot of my cooking is done on the fly and by eye, but since I wanted to share the recipe, I decided to measure as I went along. I made the dough in my food processor, but you could mix it by hand as well. I bought my ground raw almonds from Trader Joe's. You could grind your own in a food processor, but it can be tricky - a few pulses is all that separates ground almonds from almond butter! You could also try almond flour, but I believe all of the skin has been removed, so you lose some of the fiber and nutrients.
Cherry-Chocolate-Almond Scones
1 1/2 cups of ground raw almonds
1 1/2 cups all purpose flour (King Arthur Unbleached is my personal favorite)
1 tsp salt
3 tsp baking powder (my favorite is Rumford low sodium. Not only is it lower in sodium, it is aluminum free and comes in a small container, so chances are you will use it up before it loses its 'umph'
1 Tbs packed brown sugar (brown sugar has molasses, which helps food keep longer and has some trace nutrients)
1/4 cup (half of a stick) unsalted butter (if you are vegan, you could use a vegan butter substitute or palm shortening)
1/4 cup dried cherries (I get mine at Aldi or Trader Joe's. They have the following ingredients: Cherries, Sugar.)
3/4 cup milk
1/3 cup semi-sweet chocolate chips (Regular or dairy free, your call but get chips made with real vanilla, they taste so much better! Trader Joe's has them and they are usually cheaper than the national brands).
Preheat oven to 425 F for a glass baking dish, 450 F for metal.
To make in a food processor:
Put the almonds, flour, salt, baking powder, sugar, butter, and cherries in the food processor and pulse until the butter is cut-in (if you want the cherry chunks to be bigger, add them AFTER you cut in the butter). Add the milk and process for a few seconds to form a dough. Turn the dough out on a floured board and knead 3 or 4 times and pat out about 3/4 inch thick. Sprinkle about 1/2 the chips evenly over the dough and fold in half. Flatten again and sprinkle on the rest of the chips. Fold in half and knead 2 or 3 more times (don't over work the dough. I baked the dough as one whole round in a pie dish, but you could also cut into individual wedges and bake them on a sheet or cast iron skillet. If you bake them as a whole round, score the top of the dough into eighths (see photo)
Bake for 15 - 20 minutes (toothpick inserted near center will come out clean).
Then the hardest part: cool for 15 - 20 minutes.
To make by hand:
Dust the cherries with flour and chop to the desired consistency. Combine the almonds, flour, salt, sugar, and baking powder and cut in the butter using a pastry blender. Stir in the milk until just combined (don't over beat). Turn out and roll in the chips and bake as described above.
ENJOY!
P.S., you don't have to tell people these are healthier, but you DO have to tell people they have almonds in them - nut allergies are a serious thing!
It's the ground almonds that help make the scones healthier. By substituting almond meal for half the flour, I reduced the carbs and raised the fiber content. I also added dried cherries for more flavor and fiber. Almonds are high in fat, but it is the better for you fat, and because of the fat content of the almonds, I was able to cut back on the butter and use milk instead of cream or half and half.
A lot of my cooking is done on the fly and by eye, but since I wanted to share the recipe, I decided to measure as I went along. I made the dough in my food processor, but you could mix it by hand as well. I bought my ground raw almonds from Trader Joe's. You could grind your own in a food processor, but it can be tricky - a few pulses is all that separates ground almonds from almond butter! You could also try almond flour, but I believe all of the skin has been removed, so you lose some of the fiber and nutrients.
Cherry-Chocolate-Almond Scones
1 1/2 cups of ground raw almonds
1 1/2 cups all purpose flour (King Arthur Unbleached is my personal favorite)
1 tsp salt
3 tsp baking powder (my favorite is Rumford low sodium. Not only is it lower in sodium, it is aluminum free and comes in a small container, so chances are you will use it up before it loses its 'umph'
1 Tbs packed brown sugar (brown sugar has molasses, which helps food keep longer and has some trace nutrients)
1/4 cup (half of a stick) unsalted butter (if you are vegan, you could use a vegan butter substitute or palm shortening)
1/4 cup dried cherries (I get mine at Aldi or Trader Joe's. They have the following ingredients: Cherries, Sugar.)
3/4 cup milk
1/3 cup semi-sweet chocolate chips (Regular or dairy free, your call but get chips made with real vanilla, they taste so much better! Trader Joe's has them and they are usually cheaper than the national brands).
Preheat oven to 425 F for a glass baking dish, 450 F for metal.
To make in a food processor:
Put the almonds, flour, salt, baking powder, sugar, butter, and cherries in the food processor and pulse until the butter is cut-in (if you want the cherry chunks to be bigger, add them AFTER you cut in the butter). Add the milk and process for a few seconds to form a dough. Turn the dough out on a floured board and knead 3 or 4 times and pat out about 3/4 inch thick. Sprinkle about 1/2 the chips evenly over the dough and fold in half. Flatten again and sprinkle on the rest of the chips. Fold in half and knead 2 or 3 more times (don't over work the dough. I baked the dough as one whole round in a pie dish, but you could also cut into individual wedges and bake them on a sheet or cast iron skillet. If you bake them as a whole round, score the top of the dough into eighths (see photo)
 |
| (c) 2013 Eric E. Paige, All Rights Reserved |
Bake for 15 - 20 minutes (toothpick inserted near center will come out clean).
Then the hardest part: cool for 15 - 20 minutes.
 |
| (c) 2013 Eric E. Paige, All Rights Reserved |
 |
| (c) 2013 Eric E. Paige, All Rights Reserved |
To make by hand:
Dust the cherries with flour and chop to the desired consistency. Combine the almonds, flour, salt, sugar, and baking powder and cut in the butter using a pastry blender. Stir in the milk until just combined (don't over beat). Turn out and roll in the chips and bake as described above.
ENJOY!
P.S., you don't have to tell people these are healthier, but you DO have to tell people they have almonds in them - nut allergies are a serious thing!
Sunday, March 24, 2013
Busy Saturday...
...Lazy Sunday
A Busy Saturday
We all say it, and it's true: the weekends are far to short! Yesterday was a busy day. I belong to a cycling club, and though it is still quite chilly here in Chicago, we had our Kickoff Party last night. As the coordinator of the event, I had some last minute things to do to get ready for the guests, but I did manage to get some personal stuff done as well. Among other things, I made a batch of horseradish. As I posted earlier, it is a relatively simple thing to do, and well worth the effort.
Assuming you don't grow your own horseradish, your best bet for buying a good quality root is to go to an ethnic market or natural foods store. I got mine at a Polish market, but I suspect you could also get great roots at a Jewish market.
Horseradish is an integral part of Polish Easter celebrations as well as the Jewish Seder. In the Seder, horseradish is the most common choice for the 'Maror' or bitter herb, a reminder of the bitterness of slavery. In the Polish tradition, the horseradish symbolizes the bitterness of Christ's sacrifice, and sometimes the horseradish is colored with beet juice to represent the blood of Christ. Like the Seder, the Polish Easter celebration is filled with symbolic foods and some sources suggest this is a Christianization of the Seder, recognizing that the 'Last Supper' (Good Friday) was indeed as Seder meal.
But I digress...
The first step, peel the root. Horseradish is dense and has a thick peel, a sharp potato peel or paring knife is in order. I recommend buying the root on the day you plan to make the horseradish. I had this root stored in a cool room, but it still dried out a little, which makes it a bit tough. In fact, I probably will get a fresh root this week and make another batch for the family dinner.
The next step is to cut the root into chunks (You don't want to burn out the motor on your blender!)
These two inch chunks proved to be a bit of struggle for my blender, so I cut it into finer pieces, less than inch.
The other ingredient is vinegar. I have a one-gallon plastic jug of vinegar in the kitchen, but that's the vinegar I use for cleaning. A good quality, white vinegar, in a GLASS bottle, is what you want for this project. Pour a cup or so of the vinegar in the blender with a third of the horseradish and blend on a high setting (my blender is a vintage 8 speed, so I used the highest setting). As the horseradish gets processed, stop the blender and add more horseradish and vinegar. You may have to stop the blender periodically to pop air bubbles (be careful, you DON'T want this splashing in your eyes!). If your blender has a 'pulse' option, you may want to try that. The goal is to puree the vinegar and horseradish together into a sort of 'horseradish smoothie'. I bought fairly sizable root and used about a pint of vinegar and ended up with a blender full of horseradish.
I store it in sterilized mason jars. This year, I may try to store some of the extra in the freezer (though not in glass!). It is best made a week or less before the big day, especially if you want it to be a nice, bright white. Food safety is important, you don't want be sick, or make your guests sick. For recommendations/techniques on sterilizing the jars and guidelines on how long it will keep, check out the canning section of the USDA Website
A Lazy Sunday
After a busy Saturday, it was nice to have mellow sort of day. Sunday's are often a busy day for me. I normally like to spend the day cooking multiple dishes so I don't have to cook as much during the week, or, weather permitting, heading out with my camera and exploring the city. Today, not so much. I think it's good for our bodies and our souls to get some rest and unwind. When we are kids, we fight naps with every fiber of our being, but as an adult, I have developed a fondness for them, and I indulged in a rather lengthy one today. Relaxed and refreshed, I edited a few photos, and wrote this post, and I think that's plenty for today!
We all say it, and it's true: the weekends are far to short! Yesterday was a busy day. I belong to a cycling club, and though it is still quite chilly here in Chicago, we had our Kickoff Party last night. As the coordinator of the event, I had some last minute things to do to get ready for the guests, but I did manage to get some personal stuff done as well. Among other things, I made a batch of horseradish. As I posted earlier, it is a relatively simple thing to do, and well worth the effort.
Assuming you don't grow your own horseradish, your best bet for buying a good quality root is to go to an ethnic market or natural foods store. I got mine at a Polish market, but I suspect you could also get great roots at a Jewish market.
 |
| Horseradish Root (c) 2013 Eric E. Paige, All Rights Reserved |
Horseradish is an integral part of Polish Easter celebrations as well as the Jewish Seder. In the Seder, horseradish is the most common choice for the 'Maror' or bitter herb, a reminder of the bitterness of slavery. In the Polish tradition, the horseradish symbolizes the bitterness of Christ's sacrifice, and sometimes the horseradish is colored with beet juice to represent the blood of Christ. Like the Seder, the Polish Easter celebration is filled with symbolic foods and some sources suggest this is a Christianization of the Seder, recognizing that the 'Last Supper' (Good Friday) was indeed as Seder meal.
But I digress...
The first step, peel the root. Horseradish is dense and has a thick peel, a sharp potato peel or paring knife is in order. I recommend buying the root on the day you plan to make the horseradish. I had this root stored in a cool room, but it still dried out a little, which makes it a bit tough. In fact, I probably will get a fresh root this week and make another batch for the family dinner.
 |
| Peeled Horseradish (c) 2013 Eric E. Paige, All Rights Reserved |
The next step is to cut the root into chunks (You don't want to burn out the motor on your blender!)
 |
| (c) 2013 Eric E. Paige, All Rights Reserved |
These two inch chunks proved to be a bit of struggle for my blender, so I cut it into finer pieces, less than inch.
 |
| (c) 2013 Eric E. Paige, All Rights Reserved |
The other ingredient is vinegar. I have a one-gallon plastic jug of vinegar in the kitchen, but that's the vinegar I use for cleaning. A good quality, white vinegar, in a GLASS bottle, is what you want for this project. Pour a cup or so of the vinegar in the blender with a third of the horseradish and blend on a high setting (my blender is a vintage 8 speed, so I used the highest setting). As the horseradish gets processed, stop the blender and add more horseradish and vinegar. You may have to stop the blender periodically to pop air bubbles (be careful, you DON'T want this splashing in your eyes!). If your blender has a 'pulse' option, you may want to try that. The goal is to puree the vinegar and horseradish together into a sort of 'horseradish smoothie'. I bought fairly sizable root and used about a pint of vinegar and ended up with a blender full of horseradish.
 |
| The Final Product (c) 2013 Eric E. Paige, All Rights Reserved |
I store it in sterilized mason jars. This year, I may try to store some of the extra in the freezer (though not in glass!). It is best made a week or less before the big day, especially if you want it to be a nice, bright white. Food safety is important, you don't want be sick, or make your guests sick. For recommendations/techniques on sterilizing the jars and guidelines on how long it will keep, check out the canning section of the USDA Website
A Lazy Sunday
After a busy Saturday, it was nice to have mellow sort of day. Sunday's are often a busy day for me. I normally like to spend the day cooking multiple dishes so I don't have to cook as much during the week, or, weather permitting, heading out with my camera and exploring the city. Today, not so much. I think it's good for our bodies and our souls to get some rest and unwind. When we are kids, we fight naps with every fiber of our being, but as an adult, I have developed a fondness for them, and I indulged in a rather lengthy one today. Relaxed and refreshed, I edited a few photos, and wrote this post, and I think that's plenty for today!
Wednesday, March 20, 2013
SPRING - A Time For New Beginnings, But Don't Forget Your Roots!
Though it's only 24 degrees here in Chicago, today is the first day of Spring -- the perfect time to start something new. Last year I launched a website for my artwork Today I am taking things a step further, by launching this blog (or relaunching it if you a are viewing it on my artwork website). Over the past year I have received a lot of positive feedback on my Facebook posts, particularly my cooking and re-purposing projects, as well as my art and photography. This blog will share my projects along with other helpful information that I come across.
There are many types of artists and artwork -- while some of my work might have a greater meaning, a lot of it is created because I think we should all live in beautiful surroundings. The same goes for my other projects. Having picked a lot of low paying jobs over the years, I have taught myself how to do a lot with a little. You don't need a big budget to make your home beautiful or put a delicious, healthy meal on the table, and this blog will show you how.
So that's the New Beginning, now for the roots -- literally and figuratively. Spring is a time for celebration in most cultures. Having been raised in the Christian tradition, that celebration is Easter. My Mother's family is Polish, and for the Polish, Easter is perhaps the most important holiday of the year, therefore, it also has special foods. My favorite is Easter or świeże kielbasa (świeże means fresh) served with horseradish. My grandmother didn't make fresh horseradish, she bought it in a jar from the local grocery store. I didn't have the real deal until I was living in upstate NY. I learned how to make it from a Slovenian farmer. Every year his son-in-law and his friends would come over to help dig the roots and clean and peel them. Depending on how potent the roots are, this could be an experience that literally brought tears to your eyes. After cleaning and peeling the roots were cut into smaller pieces and processed in a blender to the desired consistency. The end product was not the yellowish gray mush you buy in the store, but a snow white condiment bursting with not just heat, but flavor. It was love at first bite!
My first attempt to make horseradish on my own was less successful. The root I bought was on the weak side and was a little too tough and stringy. I decided that probably a store bought root was just not going to cut it and since I no longer lived in Upstate NY and had no place to grow horseradish that I would have to just enjoy the memory of days gone by. For the past few years I have spent Easter here in Chicago with my brother-in-law's cousins. Also of Polish descent (my brother-in-law's Grandfather had a Polish grocery store in Chicago's Bridgeport neighborhood), they enjoy many of the same Polish foods that I had growing up. Last year, while poking around one the Polish markets, I saw horseradish root and decided to give it one more try (worst case scenario, it would suck and I would bring something else to the dinner). The roots looked much fresher than the one I had bought at a grocery chain years ago and when I picked one up, there was actually a faint smell of horseradish. It turned out quite well and got rave reviews on Easter Sunday, so I am making it again this year. I picked up a root today (pictured here) and will post pictures of the finished product.
We are a nation of immigrants and while it is important to move forward, it is also important to remember where we came from. In a culture that values homogeneity as much as ours, traditions can fade quickly. All four of my Mother's grandparents were from Poland, her parents could speak Polish, my Mom can understand most of a conversation in Polish but cannot speak it fluently, and my sister and I only know a few words and phrase. Food is a great way to honor our heritage - a direct sensory connection to the past. I hope, whatever your heritage, you take the time this Spring to enjoy the foods and traditions of your ancestors.
There are many types of artists and artwork -- while some of my work might have a greater meaning, a lot of it is created because I think we should all live in beautiful surroundings. The same goes for my other projects. Having picked a lot of low paying jobs over the years, I have taught myself how to do a lot with a little. You don't need a big budget to make your home beautiful or put a delicious, healthy meal on the table, and this blog will show you how.
So that's the New Beginning, now for the roots -- literally and figuratively. Spring is a time for celebration in most cultures. Having been raised in the Christian tradition, that celebration is Easter. My Mother's family is Polish, and for the Polish, Easter is perhaps the most important holiday of the year, therefore, it also has special foods. My favorite is Easter or świeże kielbasa (świeże means fresh) served with horseradish. My grandmother didn't make fresh horseradish, she bought it in a jar from the local grocery store. I didn't have the real deal until I was living in upstate NY. I learned how to make it from a Slovenian farmer. Every year his son-in-law and his friends would come over to help dig the roots and clean and peel them. Depending on how potent the roots are, this could be an experience that literally brought tears to your eyes. After cleaning and peeling the roots were cut into smaller pieces and processed in a blender to the desired consistency. The end product was not the yellowish gray mush you buy in the store, but a snow white condiment bursting with not just heat, but flavor. It was love at first bite!
My first attempt to make horseradish on my own was less successful. The root I bought was on the weak side and was a little too tough and stringy. I decided that probably a store bought root was just not going to cut it and since I no longer lived in Upstate NY and had no place to grow horseradish that I would have to just enjoy the memory of days gone by. For the past few years I have spent Easter here in Chicago with my brother-in-law's cousins. Also of Polish descent (my brother-in-law's Grandfather had a Polish grocery store in Chicago's Bridgeport neighborhood), they enjoy many of the same Polish foods that I had growing up. Last year, while poking around one the Polish markets, I saw horseradish root and decided to give it one more try (worst case scenario, it would suck and I would bring something else to the dinner). The roots looked much fresher than the one I had bought at a grocery chain years ago and when I picked one up, there was actually a faint smell of horseradish. It turned out quite well and got rave reviews on Easter Sunday, so I am making it again this year. I picked up a root today (pictured here) and will post pictures of the finished product.
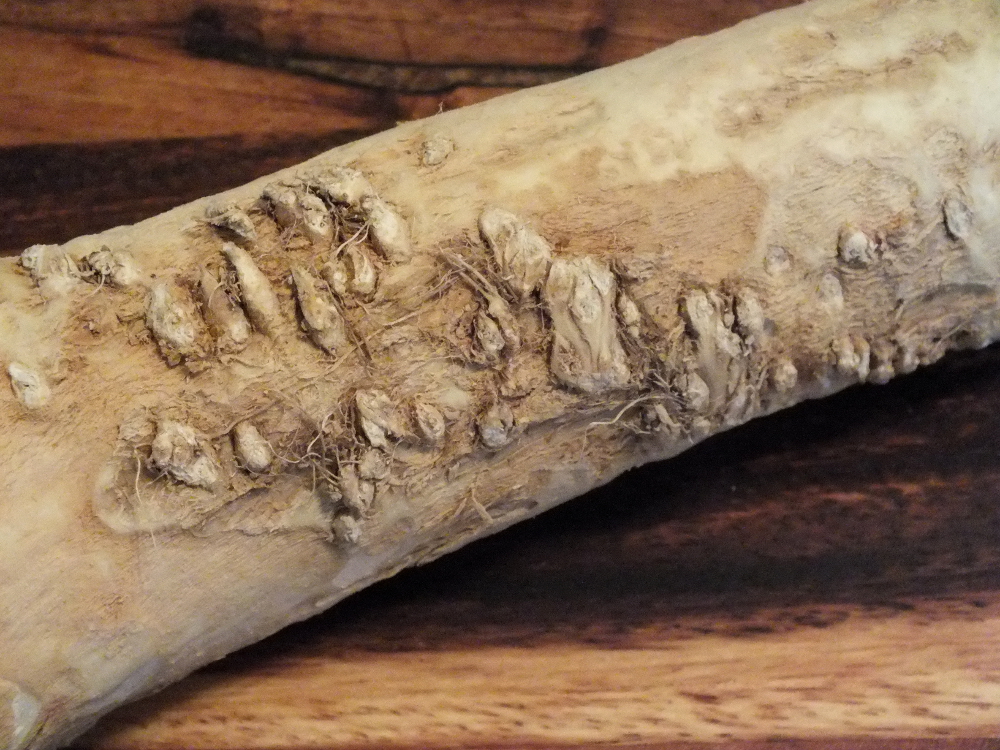 |
| Horseradish Root (c) 2013 Eric E. Paige, All Rights Reserved |
We are a nation of immigrants and while it is important to move forward, it is also important to remember where we came from. In a culture that values homogeneity as much as ours, traditions can fade quickly. All four of my Mother's grandparents were from Poland, her parents could speak Polish, my Mom can understand most of a conversation in Polish but cannot speak it fluently, and my sister and I only know a few words and phrase. Food is a great way to honor our heritage - a direct sensory connection to the past. I hope, whatever your heritage, you take the time this Spring to enjoy the foods and traditions of your ancestors.
Subscribe to:
Posts (Atom)