Showing posts with label paint. Show all posts

Wednesday, April 10, 2013

Reclaiming Space...
...Bringing A Sun Porch From the 70s Into The 21st Century

Like many older Chicago apartments, mine has a back porch that was enclosed as a living space. At some point, probably in the 1970s, the walls and even the door were covered with paneling. Though the space faces north, it is at the back of the building so it has no obstructions and is actually one of the brightest rooms in the apartment.  I knew with a bit of a face lift it could be a great bonus room.

The only thing worse than paneling? Mismatched paneling!
(c) Eric E. Paige, All Rights Reserved

South wall, formerly the exterior of the building.
(c) Eric E. Paige, All Rights Reserved
North wall. Note the patched paneling.
(c) Eric E. Paige, All Rights Reserved

East Wall. Unfortunately someone paneled over the  door,
but the closet is a nice bonus!
(c) Eric E. Paige, All Rights Reserved
My budget didn't allow for sheetrock, but the landlord did give me permission to fill the grooves in the paneling and to paint.  I used Durabond to fill the gaps.  You could use regular joint compound, but the Durabond is a 'setting-type joint compound', so it hardens faster.  You have to mix it in small batches because, unlike regular joint compound or spackle, once the product starts to set up you can't extend the working time by adding water.  I used one of the easy sand varieties.  It comes in various setting times; I think I used the either the 45 or 60 minute.  More detailed info on the product can be found at your local hardware store or home center or from the manufacturer, USG.

First coat of  Durabond.
(c) Eric E. Paige, All Rights Reserved

(c) Eric E. Paige, All Rights Reserved
I had hoped to remove to the paneling from the door, but unfortunately, it was holding in the lock set. I was a bit disappointed that my original door was going to look like a modern hollow-core door. I decided that trimming out the door would help.  As I was going through some boxes, I found an Asian-Inspired wall hanging and a picture frame that I could use to add some depth to the door.

Wall hanging from a discount store.
(c) Eric E. Paige, All Rights Reserved
Turns out this old picture frame
 was just the right proportions.
(c) Eric E. Paige, All Rights Reserved
It took a couple of coats of the Durabond, and then, of course, was the sanding! Once everything was sanded, I primed with a stain blocking primer and then painted.  The darker wood paneling had an exceptionally high amount of tannin bleeding through the water based stain block, so I ended up switching to an oil-based version (glad it was warm weather and that the room had windows!

Prematurely gray from the dust!
(c) Eric E. Paige, All Rights Reserved
Multiple coats of primer,
and it's starting too look more like plaster!
(c) Eric E. Paige, All Rights Reserved
Under the window was more damaged,
so a different approach was required.
(c) Eric E. Paige, All Rights Reserved
The area under the window required special attention. Not only was the paneling patched (to cover the vent hole from an old heater or dryer), but it was warped and water damaged (from water getting in the vent hole).   I had in my stash several cupboard doors that were just the right height to panel under the window.  The doors were slightly narrower than I wanted, but I filled in the gaps with stock modeling (parting stop) and 1" x 4" lumber.  

These doors were all the same style,
but not the same color.  Ahh the magic of primer!
(c) Eric E. Paige, All Rights Reserved
Doors in place, the gap will get filled with molding.
(c) Eric E. Paige, All Rights Reserved
All of the pieces in place.  The wall was warped,
so I had to install the shoe-mold right away to hold everything in place.
(c) Eric E. Paige, All Rights Reserved
All trimmed out, caulked, and painted.
(c) Eric E. Paige, All Rights Reserved
The original baseboard was not only ugly, but it it didn't fit right.  The floor also has quite a slant since this was originally a porch.  I used a combination of 1" x 4" and 1" x 6" to make a new baseboard.

The piece on the left was cut at angle to match the slope of the floor.
The piece on the right is a 1"x 6", while the piece on the opposite wall (not shown) is a 1" x 4"
(c) Eric E. Paige, All Rights Reserved
Shoe mold hides the gap between the baseboard and the floor
(c) Eric E. Paige, All Rights Reserved
I had to get a little creative in this corner....
(c) Eric E. Paige, All Rights Reserved
The last thing to paint and trim out was the back door.  I didn't feel like buying another can of paint, so I took some leftover paint and custom tinted it.  It took 3 tries, but I finally got the color I wanted.

(c) Eric E. Paige, All Rights Reserved
Two of the Three pieces of door molding installed.
(c) Eric E. Paige, All Rights Reserved
The final piece of door trim, baseboard, and shoe mold.
(c) Eric E. Paige, All Rights Reserved
Once the trim work was complete, I painted the floor, hung the curtains and moved in some furniture.

(c) Eric E. Paige, All Rights Reserved

(c) Eric E. Paige, All Rights Reserved

Media cabinet, turned art-supply storage!
(c) Eric E. Paige, All Rights Reserved
The room has undergone a few changes since I finished it. The media cabinet pictured above was given to me several months after I finished the space.  I've since moved in a larger table and I mostly use the space for art projects that don't require paint or glue.  If your wondering how I got such a big piece of furniture in there, well that's a story for another post....

Thursday, March 21, 2013

One Person's Trash...
...Can Be A Decorating Treasure

I mentioned yesterday that I would be posting re-purposing projects. My sister was one of the first people to suggest I start a blog, and this project is the one that prompted her to make that suggestion. I am definitely not above dumpster diving and when I was walking back from the recycling center I saw this very bright yellow stool in an alleyway (I know it looks white in this picture, but you will see in later shots that it was canary yellow). It was missing its rush seat and a little wobbly, but it definitely had potential.

(c) 2012 Eric E. Paige, All Rights Reserved
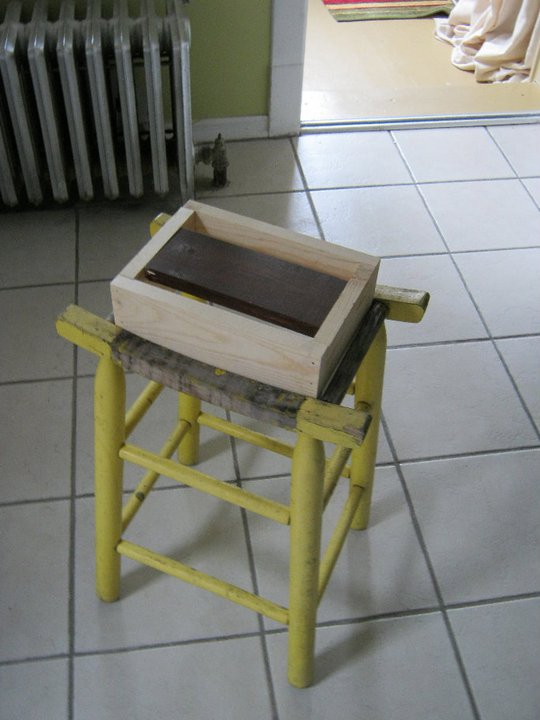
I briefly toyed with the idea of re-weaving the seat, but I had just finished working on the sun-porch and wanted a little table to use as a plant stand. I had a small collection of Asian inspired items and the lines of the stool definitely fit in with that theme. I also had a fair amount of scrapwood, mostly ends of boards that I had trimmed for other projects. I used scrap 1" x 3" to make a box that set inside the top of the stool:

(c) 2012 Eric E. Paige, All Rights Reserved

I screwed the box in place from the inside (which also helped make the piece more sturdy). The cross piece (the darker board) not only provided bracing, but also gave me something to attach the table top to. For the top I used a scrap piece of 1" x 12".

(c) 2012 Eric E. Paige, All Rights Reserved

If you're building something from disparate elements, primer is your best friend. Once everything is all one color, you can quickly tell if the piece is going to work. I knew that at least part of the table I wanted to do in a faux finish that simulates old varnish. That particular technique requires a red base coat so I use a red primer. Anyone who has tried to paint a room red knows that it takes numerous coats to get full coverage. This particular primer solves that problem. The good news is, I only paid $2 for the quart of primer, the bad news is I paid that little because the local paint store was no longer carrying the product. I checked the manufacturer's website and fortunately, if any of you are planning on painting something red, the product is still available. I am not sure of the price, but if you've ever had to paint 5 or 6 coats on a wall, a primer that cuts that number down is worth its weight in gold. Here is the link: http://www.muralo.net/products/primers_interior_2279.php

And here is the table all primed:

(c) 2012 Eric E. Paige, All Rights Reserved

I used a fairly thin black paint as a glaze over the red primer, giving the illusion of a wood grain. I used a fairly coarse brush to get some nice grain lines. A disposable 'chip brush' (those inexpensive bristle brushes sold at most hardware stores) works great for this. I used latex paint, so I had to work fairly quickly, but on a small piece like this, it's fairly easy. I knew I wanted to highlight part of the piece with a gold finish, and at first I thought part of it should be green to coordinate with the room where the finished piece would live.

(c) 2012 Eric E. Paige, All Rights Reserved

Though I liked the look, it was still pretty obvious the top was a piece of scrap pine, so I decided to give it some texture and patina by applying a porcelain crackle medium. You'll also noticed I changed the color scheme...

(c) 2012 Eric E. Paige, All Rights Reserved

In the end, I changed the color scheme one more time, deciding that the green just wasn't working. Here are some pictures of the final product:

(c) 2012 Eric E. Paige, All Rights Reserved

So before you discard something, take a good look at it. It may just need a new coat of paint, or perhaps you can make it into something completely new!

There are more re-purposing projects on my blog.  Click here for one of my favorites!