Showing posts with label faux finish. Show all posts

Tuesday, April 2, 2013

Affordable Lighting...
...With Just A Few Brushstrokes

As you may have gathered from my paintings (click here to check them out), I am a fan of the Arts & Crafts Period. Some of my favorite pieces from this era are lamps. I love the soft glow from a lamp with a mica shade and the play of color from a stained glass shade. Buying period lamps or even high quality reproductions is a bit out of my price range, though. Fortunately, thrift shops are a great source for finding great lamps that just need a little update to their finishes.

This first lamp had that antique brass finish found on so many replica pieces. It was also missing it's glass shades.

Waterlily Lamp
(c) 2012 Eric E. Paige, All Rights Reserved

The first step is to check the lamp over to make sure the cord and socket are in good shape, and that the lamp works. Don't despair if you find a great lamp with a bad cord or socket, these parts can be replaced. If you aren't mechanical, there are lamp and hardware stores that will do the re-wiring.

I decided for this lamp I wanted more of a copper tone rather than brass, and I wanted to add just a hint of color on the lily pad and blossom. I cleaned the surface with rubbing alcohol to remove any dirt and grease that might prevent the paint from adhering. In this case I painted directly on the metal, but if the lamp is going to be handled quite a bit or is subjected to humidity or temperature changes, you might want to prime the surface with a metal primer. Try to pick a primer similar in color to your base coat. For example, I would use a red primer for a copper painted piece.

Metallic paints often take several coats (though a primer will help reduce that number). Once I had the whole thing a nice copper color, I went back and lightly brushed on some metallic colors to bring out the lily pad and blossom. Though the glass shades were missing, I found two mica shades for 50 cents each at a thrift shop. Though they don't look like lilies, they are similar to other lamp shades from the Arts and Crafts Period.

Base after applying copper paint and metallic colors
(c) 2012 Eric E. Paige, All Rights Reserved
Detail of mica shade
(c) 2012 Eric E. Paige, All Rights Reserved
The finished piece
(c) 2012 Eric E. Paige, All Rights Reserved

Sometimes it is not just the base that has a not so great finish. This next lamp had a nice shape, but the glass shade was definitely stuck in the 1980s!

Stained Glass Lamp, circa 1980s
(c) 2012 Eric E. Paige, All Rights Reserved

I used a combination of glass paint, acrylic mediums, and metallic paints, to glaze over the original colors to get the colors that I wanted. I also painted over the black 'leading' with pewter colored paint to make it look more like real lead. As with the other lamp, I base coated the body in copper and used colorful metallic paints to highlight the design.

The finished piece.
I painted over the 80s color scheme with glass and metallic paints
(c) 2012 Eric E. Paige, All Rights Reserved
Lamp base painted in copper and detailed with metallic paints.
I also applied a coat of  asphaltum to bring out the details
(c) 2012 Eric E. Paige, All Rights Reserved

I was pretty aggressive with my color on the stained glass, because I knew I wouldn't have this lamp on very often, so the translucency wasn't the main concern. Still, it's not too bad when lit. I have since done some other shades using solely glass paint, and they definitely do better when lit. I don't leave the bulbs on in these lamps very long and use a lower wattage bulb so as not to melt the paint.

The shade lit
(c) 2012 Eric E. Paige, All Rights Reserved

The next lamp was made from two separate purchases. I found the shade at a thrift store for a few dollars, but it is missing the piece that allows it to attach to a base (it also was missing the base!). I found the base at a yard sale. It had a paper shade that was squarish like my glass shade. I removed the paper part of the shade exposing just the wire framework and then 'squished' the framework flatter to accommodate the shorter glass shade and simply set the shade on the wire frame. Though this works, it isn't the most sturdy solution and you wouldn't want to do it in an area where the lamp might get bumped or handled a lot (I have the outlet on a remote, so the only time I need to touch the lamp is when I dust it or change the bulb).

Prairie style lamp
Prairie Style lamp shade as missing the top piece
(c) 2012 Eric E. Paige, All Rights Reserved
I found the wooden base at a garage sale.
I reshaped the metal frame from a lampshade to hold the glass shade
(c) 2012 Eric E. Paige, All Rights Reserved

Paint can also be useful for matching replacement parts. This ceiling fixture, which I picked up for under $15, was missing the chain and the hardware to mount it to the ceiling, including the cover for the wiring. While I was able to find chain in a color that look alright, all of the covers were in bright brass, antique brass, and chrome. I simply painted the cover a copper tone similar to the color of the fixture.

Prairie Style ceiling light
(c) 2012 Eric E. Paige, All Rights Reserved
A bit of copper paint makes the replacement cap match the light
(c) 2012 Eric E. Paige, All Rights Reserved

Not all lamps are so labor intensive. This next one had a nice finish, but was missing its glass shade. My living room and dining room are in different styles and open to each other, so I like to have some elements in each room provide a nod to the other room's style. I simply put an inexpensive contemporary shade from IKEA on this Craftsman-style base. No paint, no labor, and under $25 for the lamp and shade!

This Goodwill find has great Craftsman Style details
(c) 2012 Eric E. Paige, All Rights Reserved
The stained glass shade was missing.
This simple, white shade fit great,
and fits in with the more modern decor of this room
(c) 2012 Eric E. Paige, All Rights Reserved 

Lighting is key to a great looking room, and with a little paint, some imagination, and perhaps a new lampshade, you can have great looking lamps at affordable prices.

Monday, March 25, 2013

Re-Purposing A Table...
...Right-Sizing A Room

Lately I have been hearing a term on home improvement shows: 'right-sizing". The concept is simple, you use the space you have to its fullest potential for YOUR lifestyle. If space is at a premium, you need to think beyond the architect's designation for the room. My current place is a two bedroom apartment. It is a classic Chicago, brick 2-Flat, with a bay window front. The living room and dining room are basically open to each other with a large, framed opening delineating the two rooms. The living room is actually the smaller of the two spaces. When I first moved in, I used each room as a living room. I have always thought dining rooms were a waste of space. I prefer to eat in the living room in a comfortable chair or on the couch. Having just moved out of a studio apartment, I liked the idea of having two living rooms!

Then Thanksgiving came. Thanksgiving is one of my favorite holidays, and I wanted to host a Thanksgiving dinner. My landlord's unit has the same floorplan, and he had the front room (meant to be a living room) as a dining room and the dining room was the living room. This made perfect sense for the way we live today. When the building was built, 'parlor suites' were smallish pieces of furniture, a chair or two and a loveseat or divan, whereas a dining room from that period might have a table and chairs, a buffet, and a china cabinet. The modern living room generally has much larger furniture, plus a coffee table and a TV. I decided for the holiday, I would turn the front living room into a dining room. I ended up borrowing the landlord's table (thankfully it was from Ikea and very easy to take apart and carry upstairs). To my surprise, I liked having just one living room (much cozier), and really liked the look of a dining room. After returning the dining table to its rightful owner, I decided it might be time to look for one of my own.

I was fortunate to find the smaller version of my landlord's table at a Goodwill for only $10. At that price I figured it would work for now, and perhaps someday I would salvage the legs and put on a larger table top.

Fortune smiled upon me a few weeks later and I found an oak coffee table that was a little worse for wear, but the wood was absolutely beautiful, and it was only $6.99! As you can see, it had some water rings, scratches, and a honey oak finish that didn't quite go with my decor.

Detail of a black water ring
(c) 2012 Eric E. Paige, All Rights Reserved
Detail of scratches and stains
(c) 2012 Eric E. Paige, All Rights Reserved
The table taken apart
(c) 2012 Eric E. Paige, All Rights Reserved

I disassembled the table, figuring I would refinish the apron and top, and use the legs from my other table. I didn't want to use a chemical stripper, so since I was dealing with flat surfaces, I decided to sand off the old finish with my random orbit sander. I started with an 80 grit and finished up with 120. Rather than buy wood bleach, I used Barkeeper's Friend scouring powder to remove the black water ring and a few other dark spots. Wood bleach is oxalic acid, and oxalic acid also happens to be the active ingredient in Barkeeper's friend. (Oxalic acid is toxic, so if you try this trick or use wood bleach, be sure to use caution and read and follow label precautions).

The old finish has been sanded off
(c) 2012 Eric E. Paige, All Rights Reserved

I decided to us a polyureathane/stain combo in satin finish. I found a color that would coordinate with some other furniture I had in the room. It is important to follow the instructions on the poly/stain, letting it dry thoroughly between coats. It is also important to sand between coats. I used 220 grit sanding sponges. They are reusable and much less hassle than sandpaper. As you can see, there is some beautiful grain patterns and tigering in the wood.

(c) 2012 Eric E. Paige, All Rights Reserved

Removing the legs from the other table was going to be a little more difficult than I thought, and so I decided to just set the 'new' top on the old table, and look for other options. I also decided, that while it was nice to have a dining room, I still only had dinner guests a few times a year, so I set up the table and the rest of the furniture so I could use the room as an office, but quickly put everything away if I was having a dinner party. At the time I had a small netbook which I connected to a flat screen monitor I bought at Goodwill for $15.00. I can tuck the monitor behind a console table and store the printer on the bottom shelf of a side table when not in use.

Dressed for Dinner
(c) 2012 Eric E. Paige, All Rights Reserved
The Refinished Top
(c) 2012 Eric E. Paige, All Rights Reserved
Dressed for Success
(c) 2012 Eric E. Paige, All Rights Reserved

As turned out, fortune smiled upon me again! While poking around a local used furniture and salvage store, I found a set of four table legs. I asked the owner how much they were. At first he was a bit reluctant, as he was going to use them for a similar project, but he finally decided I could have them for $20, along with the apron (which I hadn't noticed before--bonus!). I walked my new purchase home (which was about a mile); I had the legs tucked under one arm and the apron slung over one shoulder. It was Good Friday, so I felt extra conspicuous walking down the street with a large wooden object on my shoulder! The legs and apron were in good shape, so no refinishing was required. I just screwed the top to the base (there were pre-drilled holes on the base).

Apron and legs from a local thrift store
(c) 2012 Eric E. Paige, All Rights Reserved
Base and Top Assembled
(c) 2012 Eric E. Paige, All Rights Reserved

Now I have a room that is right-sized to serve double duty and a beautiful table for a little over $30 in thrift store finds and finishing supplies. So take a look around your home. Are you using each room to its fullest, best potential? While your out and about be sure to check out those thrift stores, yard sales, and clearance deals. With a little effort, you can breathe new life into an item and have a unique piece for your home (and yes, those are different chairs in the second set of photos, but that's for another post....)

Thursday, March 21, 2013

One Person's Trash...
...Can Be A Decorating Treasure

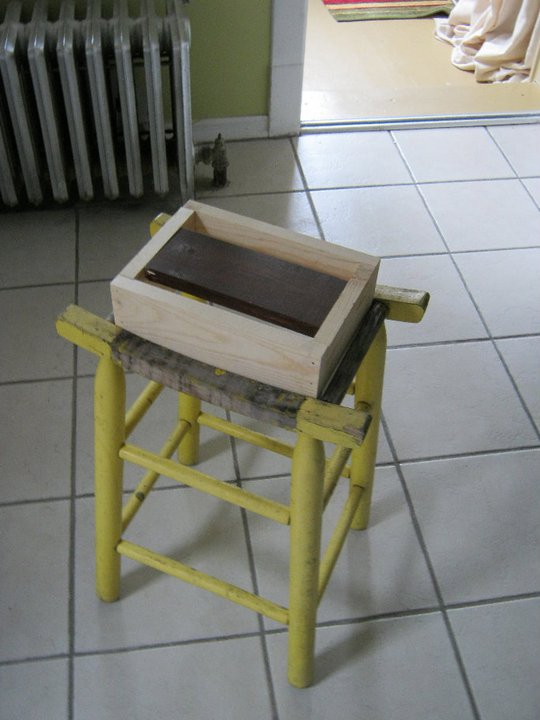
I mentioned yesterday that I would be posting re-purposing projects. My sister was one of the first people to suggest I start a blog, and this project is the one that prompted her to make that suggestion. I am definitely not above dumpster diving and when I was walking back from the recycling center I saw this very bright yellow stool in an alleyway (I know it looks white in this picture, but you will see in later shots that it was canary yellow). It was missing its rush seat and a little wobbly, but it definitely had potential.

(c) 2012 Eric E. Paige, All Rights Reserved
I briefly toyed with the idea of re-weaving the seat, but I had just finished working on the sun-porch and wanted a little table to use as a plant stand. I had a small collection of Asian inspired items and the lines of the stool definitely fit in with that theme. I also had a fair amount of scrapwood, mostly ends of boards that I had trimmed for other projects. I used scrap 1" x 3" to make a box that set inside the top of the stool:

(c) 2012 Eric E. Paige, All Rights Reserved

I screwed the box in place from the inside (which also helped make the piece more sturdy). The cross piece (the darker board) not only provided bracing, but also gave me something to attach the table top to. For the top I used a scrap piece of 1" x 12".

(c) 2012 Eric E. Paige, All Rights Reserved

If you're building something from disparate elements, primer is your best friend. Once everything is all one color, you can quickly tell if the piece is going to work. I knew that at least part of the table I wanted to do in a faux finish that simulates old varnish. That particular technique requires a red base coat so I use a red primer. Anyone who has tried to paint a room red knows that it takes numerous coats to get full coverage. This particular primer solves that problem. The good news is, I only paid $2 for the quart of primer, the bad news is I paid that little because the local paint store was no longer carrying the product. I checked the manufacturer's website and fortunately, if any of you are planning on painting something red, the product is still available. I am not sure of the price, but if you've ever had to paint 5 or 6 coats on a wall, a primer that cuts that number down is worth its weight in gold. Here is the link: http://www.muralo.net/products/primers_interior_2279.php

And here is the table all primed:

(c) 2012 Eric E. Paige, All Rights Reserved

I used a fairly thin black paint as a glaze over the red primer, giving the illusion of a wood grain. I used a fairly coarse brush to get some nice grain lines. A disposable 'chip brush' (those inexpensive bristle brushes sold at most hardware stores) works great for this. I used latex paint, so I had to work fairly quickly, but on a small piece like this, it's fairly easy. I knew I wanted to highlight part of the piece with a gold finish, and at first I thought part of it should be green to coordinate with the room where the finished piece would live.

(c) 2012 Eric E. Paige, All Rights Reserved

Though I liked the look, it was still pretty obvious the top was a piece of scrap pine, so I decided to give it some texture and patina by applying a porcelain crackle medium. You'll also noticed I changed the color scheme...

(c) 2012 Eric E. Paige, All Rights Reserved

In the end, I changed the color scheme one more time, deciding that the green just wasn't working. Here are some pictures of the final product:

(c) 2012 Eric E. Paige, All Rights Reserved

So before you discard something, take a good look at it. It may just need a new coat of paint, or perhaps you can make it into something completely new!

There are more re-purposing projects on my blog.  Click here for one of my favorites!